Get ready to experience a boost in performance, security, and stability by upgrading your MuleSoft platform to Mule Runtime 4.6 with Java 17! This guide is here to walk you through each step of the process, making it easy for everyone – whether you’re a seasoned developer or just starting on this exciting platform.
Here are 3 Reasons to Upgrade to Mule Runtime 4.6 with Java 17
- Enhanced Performance: Experience significantly improved performance through faster startup times, optimized garbage collection, and better management of large applications.
- Improved Security: Benefit from the latest security updates and patches provided by Java, ensuring your applications are protected.
- Long-Term Stability: Enjoy the advantages of Java 17’s Long-Term Support (LTS) release, providing you with ongoing stability and peace of mind.
Upgrading MuleSoft & Java: Step-by-Step
Step 1: Analyze and Prepare
- Identify your current Java and Mule Runtime versions (e.g., Mule 4.4 with Java 8).
- Conduct a compatibility audit of custom connectors and deprecated components for Java 17.
- Plan your upgrade strategy, including scheduling maintenance windows, defining rollback procedures, and preparing for rigorous testing and monitoring.
Step 2: Install Mule Runtime 4.6
- Consult the Mule Runtime 4.6 Release Notes for detailed upgrade guidance.
- Check your current runtime version in Anypoint Studio: Windows → Preferences → Runtime.
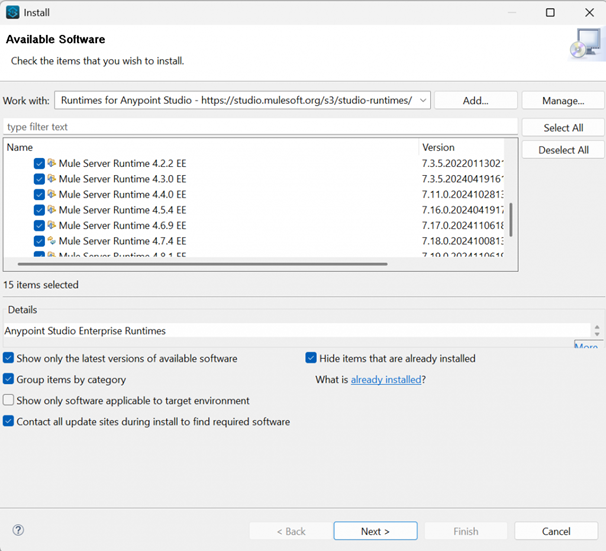
- Install the desired runtime version (e.g., Mule 4.6) in Anypoint Studio: Help → Install New Software → Search for ‘Mule Runtimes for Anypoint Studio’.
Step 3: Install Java 17
- Obtain the latest Java 17 LTS release from Oracle or OpenJDK.
- Install Java 17 on your system.
- Configure your system’s environment variables: Set the JAVA_HOME environment variable to the Java 17 installation path.

Step 4: Component and Connector Upgrades
- Upgrade to Anypoint Studio version 7.17 for optimal Java 17 support and stability.
- Upgrade all connectors and components to their latest Java 17-compatible versions within Anypoint Studio.
- Update the project’s xml file to utilize the latest Java 17-compatible connector versions. Example: xml <dependency> <artifactId>mule-http-connector</artifactId> <version>1.6.1</version> </dependency>
- Navigate to Project Settings → Modules and click ‘Update’ to obtain the latest compatible versions.
- Refactor any deprecated APIs and update incompatible libraries or components to ensure Java 17 compatibility.
- Refer to the Mule Runtime Java Support timeline for details on supported Java versions.
Step 5: Configure API Policies for Java 17
- Access API Manager: Navigate to Automated Policies and select the latest policy version.
- Define Policy Scope: Choose the target runtime environment (all runtimes, Flex Gateways, or Mule Gateways).
- Apply to Mule Gateways (Optional):
- Select “Mule gateways only” if applicable.
- Specify the Mule version range in “From version” and “To” fields.
- Set Java Compatibility: Choose “All Java versions” or specific versions.
- Save Changes: Click “Apply” to implement the policy updates.
Step 6: Upgrade API Proxies
The upgrade process varies depending on your proxy type:
- Basic Endpoint:
- Deploy the updated application to the server from Mule Runtime.
- Connect it to API Manager using auto-discovery (refer to “Configuring Mule Gateway API Auto discovery in a Mule 4 Application” for details).
- Alternatively, update the Mule application connecting to your existing Basic endpoint API instance.
- Proxy Application:
- Specific instructions for CloudHub, CloudHub 2.0, Hybrid, and Runtime Fabric deployments are provided in the guide (consult those sections for details).
Step 7: Upgrade Mule Maven Plugin
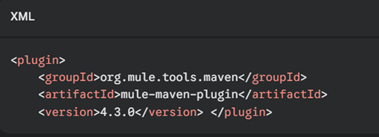
- Update Plugin Version: Ensure you’re using Mule Maven Plugin version 4.1.1 or later. Update the version in your pom.xml file:
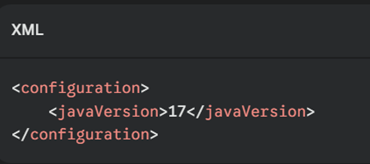
- Set Java Version: Add the javaVersion property in your pom.xml to explicitly specify Java 17:
3.Verify Deployment Semantics: For Runtime Fabric and CloudHub 2.0, ensure you use the correct semantic versioning (SemVer) tags in your deployment pipeline.
4.Deploy and Test: After configuration, deploy your application and thoroughly test it to confirm compatibility with Java 17.
Step 8: Address Error Handling Changes in Java 17
- Update Error Variable Access: Java 17 restricts direct access to internal fields. Update error variable access to use proper APIs:
- Replace error.muleMessage with error.errorMessage
- Replace error.errors with error.childErrors
Verify access to other error-related variables (like attributes and message) is also done through the correct APIs.
- Modify Custom Error Handlers: Ensure your custom error-handling logic uses the updated Mule error fields and adheres to Java 17 reflection rules.
- Review and Test Global Error Handling: Review your global error handling flows (e.g., Error Handling Scope, Try-Catch, or On-Error-Continue processors) for compatibility with the updated error variables. Test edge cases to confirm error messages, root causes, and stack traces display correctly.
- Validate DataWeave Error Responses (if applicable): For APIs returning custom error responses using DataWeave, update scripts to handle the new error structure.
- If you’re extracting the error message, replace error.muleMessage with error.errorMessage in your DataWeave script.
Step 9: Validate Compatibility in Test Environment
- Deploy applications to your test environment.
- Execute unit and end-to-end tests.
- Thoroughly test Anypoint policies, proxies, and custom Java code with Java 17.
- For older policies, re-add them, select ‘Java 17’ in Advanced Options for Mule Gateways, and apply changes.
- Confirm successful compatibility with Java 17.
Step 10: Deploy to Production and Monitor
- Deploy your applications to the production environment.
- Continuously monitor logs, performance, and system stability.
- Gather feedback from stakeholders to ensure all functionalities are working as expected.
Final Thoughts
Don’t miss out on the performance, security, and stability gains of MuleSoft 4.6 and Java 17. This upgrade is essential for future-proofing your integration applications. By following our step-by-step guide, you can seamlessly transition to the latest technologies and ensure your systems are ready for the future. Start planning your upgrade today. Contact RAVA Global for a consultation.


