Good communication is key to keeping a business running smoothly! When we foster open dialogue, it not only boosts productivity but also helps strengthen our team connections. That’s where the Discuss application comes in! It makes internal communication a breeze by bringing all our conversations, messages, and notes together in one easy-to-use spot. Plus, it’s integrated with Odoo ERP, which really helps improve efficiency.
With the Odoo 18 Discuss module, we can enjoy private and group chats while seamlessly connecting with other Odoo tools for a smoother workflow. This blogpost explains more about the Discuss module.
What’s Odoo Discuss Module?
Odoo ‘Discuss’ is a core communication module within the Odoo ERP system, designed to facilitate interactions among users. It supports both group and private chats, promoting organized and efficient communication between colleagues, clients, and other stakeholders. Seamlessly integrated with all other Odoo modules, ‘Discuss’ allows users to initiate conversations directly from any module, enhancing workflow and productivity. Typically, ‘Discuss’ is installed automatically whenever a new Odoo module is added.
Message Inbox Management in Odoo Discuss

The Discuss dashboard is displayed when you open the Discuss app.
- Inbox: Displays unread messages.
- Starred: Stores messages that have been starred by the user.
- History: Shows recent updates and discussions related to records (like sales orders, projects, etc.) that the user is assigned to or tagged in within the Odoo database.
Direct Messages enable private communication with one or more team members. To initiate a new direct message:
- Click the [Direct Message icon] next to “Direct Messages” on the Discuss dashboard.
- Enter the recipient’s name in the “Start a conversation” search bar.

There will be a default channel called ‘General.’ This channel is accessible to all users and can be used to share company information. Users can create a new channel by clicking the plus (+) button in the ‘Channels’ menu. To add more people to the channel, simply click the ‘Invite’ button.
After adding people to the channel, you can begin communication. You can share images, videos, and text files by clicking the attachment button. Use the Settings button to adjust the channel settings.

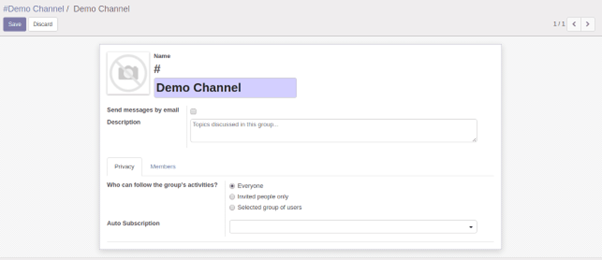
1. Send Messages by Email
If you want to send messages in the channel via email, you can activate this option. An envelope icon will appear when the channel’s messages are sent through email.
2. Description
Users can add a description for the channel to indicate its purpose.
3. Privacy
To manage who can follow the group’s activities, choose from the following options:
- Everyone: All users can see the messages in this channel.
- Invited People Only: Only invited individuals can view the channel messages.
- Selected Group of Users: Allow a specific group of users to see the messages. When you enable this option, an additional field will appear for you to enter the group information so that all users in that group can access the channel messages.
- Auto Subscription: Add groups here. Members of these groups will automatically be selected as followers of this channel.
4. Members
In this section, you can add channel listeners and check their online or offline status.
To help you stay connected, you can see the online status of your friends right next to their names. A green dot means they’re online and ready to chat, an orange dot indicates they’re idle, and a grey dot shows they’re offline. If you want to stay updated on new messages, just choose the ‘See desktop notifications’ option. It’ll give you a sneak peek of the message along with who sent it.
Final Thoughts
When used well, the chat module is a fantastic tool for communication! Since many project-related issues stem from miscommunications, this module is a great way to clear things up and keep everyone in the loop.


