In this blog, we explain how to build a scalable and secure File Upload API using MuleSoft! We’ll take a look at how to integrate Salesforce and an Identity Provider (IDP) to boost security, simplify user management, and enhance the overall experience for users in our increasingly file-driven digital world.
Leveraging MuleSoft API with RAML

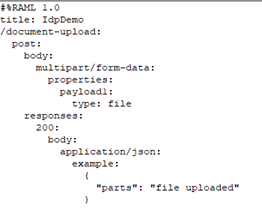
This RAML file is the starting point for your MuleSoft API implementation. You can generate an API specification from this RAML using the Anypoint Platform. MuleSoft provides tools that make development easier by creating code stubs and documentation directly from the API specification.
Sample RAML for File Upload API:
This RAML file defines a single endpoint, /document-upload, for handling file uploads. Key aspects include:
- multipart/form-data: This content type is essential for file uploads, enabling the transmission of both form data (metadata) and files within a single request.
- payload1: type: file: This property defines the file upload field, where type: file indicates that this part of the request will contain a file.
- 200: application/json: This defines the successful response with a JSON payload.
- example: This provides a sample JSON response for a successful file upload.
Implementing the File Upload API in Anypoint Studio
After you create the RAML file, go ahead and import it into Anypoint Studio. Then, let’s design a simple Mule flow within Anypoint Studio to bring the core API logic to life! This flow will take care of:
- Easily receiving uploaded files.
- Authenticating requests with an IDP connector, using both GET and POST calls.
- Transforming the received data so it fits perfectly into Salesforce.
- Using a Salesforce connector to send the processed data to Salesforce for storage and further processing.
Flow Sample:

Mapping Data to Salesforce:

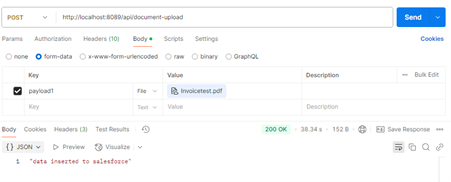
To test the File Upload API locally, deploy and execute the Mule flow on your local machine. Utilize Postman to construct and send a file upload request to the exposed API endpoint. The “form-data” option within Postman is typically used for this purpose.
Start the Flow and Track Progress:

Real-world Implementation with Experience Cloud:
Upon deploying the Mule flow to CloudHub, the API becomes externally accessible. Within the Experience Cloud, create a page featuring a file upload component. Implement JavaScript or Apex code on this page to:
- Capture the selected file.
- Make an HTTP request to the deployed CloudHub API endpoint, transmitting the file data and including the necessary authentication headers.
- Appropriately handle the API response.
Final Thoughts
By following these steps, you can successfully develop a secure and scalable File Upload API utilizing MuleSoft. Integrating this API with Salesforce and an Identity Provider (IDP) enhances security, streamlines user management, and significantly improves the overall user experience.


